chapter interfaces.
Dungeon Siege is now pretty dead and obsolete -- not sure why I'm still hosting these really…to give you a quick idea of what we’re doing, here are some finished articles:
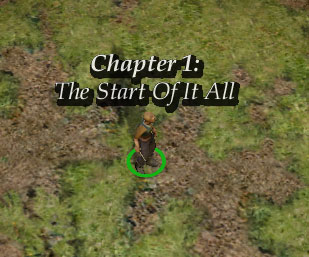
example of a finished chapter interface in-game
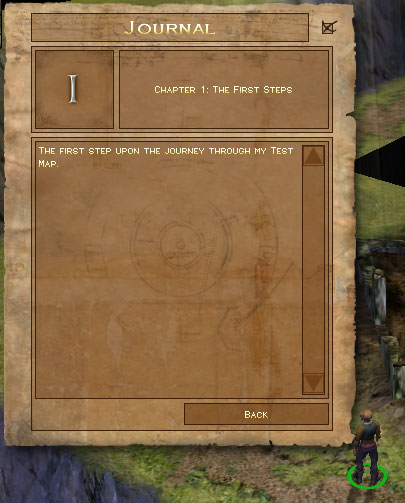
the chapter details in your journal
we’re going to jump about a bit to start with, as we need to lay the groundwork in Siege Editor first before we move over to the graphics, then we need to manually fix some bugs, and build some templates, before we can then go back into Siege Editor and set up all the triggers and gizmos that are required to set the interfaces off.
the groundwork
so, in Siege Editor with one of your map’s regions open, go to Tools | Quest/Chapter Manager.
in the Chapters group, press Add, and give the chapter a unique name - and i recommend trying to make it universally unique, but at least globally unique - i’ve gone for a fairly simple zhaph_01, zhaph_02, etc. type pattern. this is quite important, otherwise you risk confusing either the Single Player campaign or your maps or both - the single player chapter headings are all stored in logic.dsres, and so are available to all to use, so don’t call your chapters chapter_01 through chapter_09, whatever you do.
select your newly created chapter, and press Edit.
here’s where we encounter our first bug. SE doesn’t properly store the chapters Screen Name or Chapter Image, but it will store the Chapter Description in the Chapter Updates group, so add one now - give it a step value of 0, and whatever text you wish to display in the journal.
OK out of those two dialogs, save your region, then close the Siege Editor to update all the files, and enable us to change them manually later on.
creating the graphics
now let’s go into Photoshop, or a similar image editor - you really need to be able to output graphics with alpha channels, ideally in .psd format (Photoshop’s native format).
create a new image, of size 256 x 256 pixels - this is the size of all the standard chapter graphics in Dungeon Siege - note that the image size must be a power of 2 (2, 4, 8, 16, 32, 64, 128, 256 etc.) to work, and if we stick to the same size as GPG then our chapters won’t look out of place.
fill it with either a black or dark grey fill - this is going to be our shading.
with the Text tool, find a font you like, and write in your chapter heading, in white.
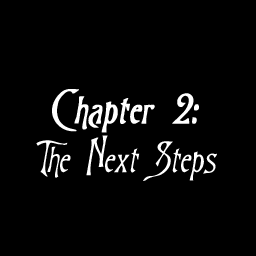
select your text, i find the best way is to use the Color Range tool (Select | Color Range) and whack the fuzziness settings up to about 200, and select anywhere that’s not the text. invert the selection, and then expand it by about one pixel (Select | Modify | Expand…), and then feather it by a further one pixel.
then, in the Channels Pallet (this should be a tab next to the Layers tab, or Window | Show Channels), hit the Save Selection As Channel button to create a new channel, which should by default be called Alpha 1 (with the space) - if it’s not, rename it. this should create a fairly fuzzy blocked version of your text (You may need to turn the channel on to see this).
 make sure that the channel has a black background, otherwise you might end up with a slightly faded square appearing on screen.
finally, flatten the image (Layers | Flatten Image), prior to saving.
save your image as a psd in the following location (you’ll need to create a few of these folders yourself and this assumes you’ve not messed about with the default settings of Dungeon Siege or the Siege Editor, if you have, you’ll need to dig out the bits folder it’s working to):
C:\My Documents\Dungeon Siege\Bits\art\bitmaps\gui\nis
And name it:
b_gui_nis_[chaptername].psd
The first part (b_gui_nis_) is required like that so that Dungeon Siege can find the image properly, the second part should be something descriptive enough for you to remember what it’s about, i found naming it after the chapter keeps things simple.
some work in Windows Explorer
in the same directory, create a new text file with the same name as your image, but ending in .gas (not .txt, and make sure it really is a .gas file, if not, you might need to turn on “File Extensions for Known Types” in windows explorer’s Tools | Folder Options | View dialog). This should contain something along these lines:
[t:tsd,n:b_gui_nis_zhaph02]
{
   b dither = true;
   b hasalpha = true;
   layer1texture1 = b_gui_nis_zhaph02;
   i texturedetail = 0;
}
where the name of layertexture1 is the same (without the extension) as the image you saved.
navigate to:
C:\My Documents\Dungeon Siege\Bits\ui\interfaces\chapters
again, if these don’t exist, create them, and one further one in chapters, called exactly the same thing as the chapter name we created at the beginning, then create a new text file in there, called (surprisingly) exactly the same as the folder, with a .gas extension, so following my examples above:
C:\My Documents\Dungeon Siege\Bits\ui\interfaces\chapters\zhaph_02\zhaph_02.gas
this needs to contain the following code:
[zhaph_02]
{
   b interface = true;
   centered = fade_window;
   [t:window,n:fade_window]
   {
      f alpha = 1.000000;
      b common_control = false;
      common_template = ;
      i draw_order = 1;
      rect = 181,111,437,367;
      texture = b_gui_nis_zhaph02;
      uvcoords = 0.000000,0.000000,1.000000,1.000000;
      wrap_mode = clamp;
      pass_through = true;
      topmost = true;
      [messages]
      {
         onanimcomplete = notify(fade_chapter);
      }
   }
}
changing the template block name, (the bit in square brackets at the top), and the value of texture in the window block. this is the other advantage of using the same size images as GPG - you don’t have to work out the positioning yourself of the corners!
save that, and then navigate to:
C:\My Documents\Dungeon Siege\Bits\world\maps\[map_name]\quests
where map_name is the name of your map.
if it doesn’t already exist (here’s the direct evidence of the bug we encountered earlier), create a text file called quests.gas in this folder.
this needs one block to start with, although you may already have [quests] in there if you’ve created some.
make sure at the top of the file is a block called [chapters], and enter the following in it (you should find your description and order values in there already, and you just need to add the chapter image and screen name entries. make sure you end each line with a semi-colon):
[chapters]
{
   [zhaph_01]
   {
      chapter_image = b_gui_ig_mnu_jnl_chapter_01;
      screen_name = "Chapter 1: The First Steps";
      [*]
      {
         description = "The first step upon the journey through my Test Map.";
         order = 0;
      }
   }

   [zhaph_02]
   {
      chapter_image= b_gui_ig_mnu_jnl_chapter_02;
      screen_name = "Chapter 2: The Next Steps";
      [*]
      {
         description = "So, you've taken your first steps.\n\n You've made some choices, and set in motion some serious events.\n\n Can you live up to your destiny?"
         order = 0;
      }
   }
}
obviously if you only have one chapter, only put one block in, and where I’ve got zhaph_01 and zhaph_02 you’d put your chapter names.
the image referenced here is the image you want displaying in the journal - I’ve used the default GPG images of roman numerals here.
save that file, and then go back into Siege Editor.
back in Siege Editor
start by placing a Generic Trigger in the area you want to fire the Chapter transition - if this is your first chapter a good place to put it is next to the initial mood trigger you’ve placed near the staring points, otherwise somewhere the players have to walk through during your maps.
bring up the triggers property sheet, and create a New Trigger. select it, and Add a Condition - party_member_within_bounding_box - make the conditions large enough to ensure the player can’t walk around it, and make sure you’ve checked “One Shot” in the Trigger Properties group.
OK that dialogue for now.
then, near the trigger, place an activate_chapter and an interface_fade special gizmos, with similar property settings to these:
activate_chapter
at the top of the Template Properties components, in the activate_chapter block, enter your chapters name in the value column for the “chapter” field.
interface_fade
slightly further down the Template Properties section this time, in the interface_fade block, set the interface to the name of the chapter, and the duration to about 7 (again, based on the GPG durations).
apply the properties dialog
select your trigger, the properties window will update, and if it doesn’t automatically, change the page to the Trigger Properties tab.
add a new action - send_world_message - leave “Message Type” and “Message broadcast” as they are, and set the “Send to Object” value to the SCID of the activate_chapter gizmo - select it, copy the SCID from the Template Properties tab, reselect the trigger and paste it in, once you move the cursor out of the value field a green line with moving arrows should appear from the template to the gizmo.
add a second action - again send_world_message - but this time change “Message broadcast” to all_conditions (it’s a dropdown, just click into it). Set the “Send to Object” value to the SCID of the interface_fade gizmo. You should now have two green lines with arrows coming from the trigger, one to each gizmo.
save your region, and fire the map up in DSMod - use this as you won’t need to build the map or tank up the rest of your bits directory until you’re ready to release your mod to others. It also provides much more detailed information if things aren’t quite as Dungeon Siege expects.
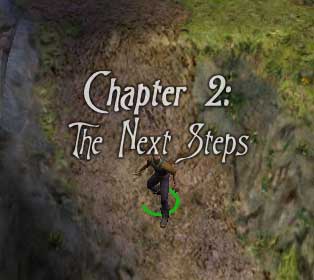
you should then have the following appear when you walk through your trigger, or as the map starts:
that should all work for you - i’ve tried to be as verbose as possible, and did all these steps again myself as i was writing this to ensure that i didn’t forget anything. if it still doesn’t work for you shout, and tell me what’s not happening.